Showing posts with label dessert. Show all posts

12.26.2013

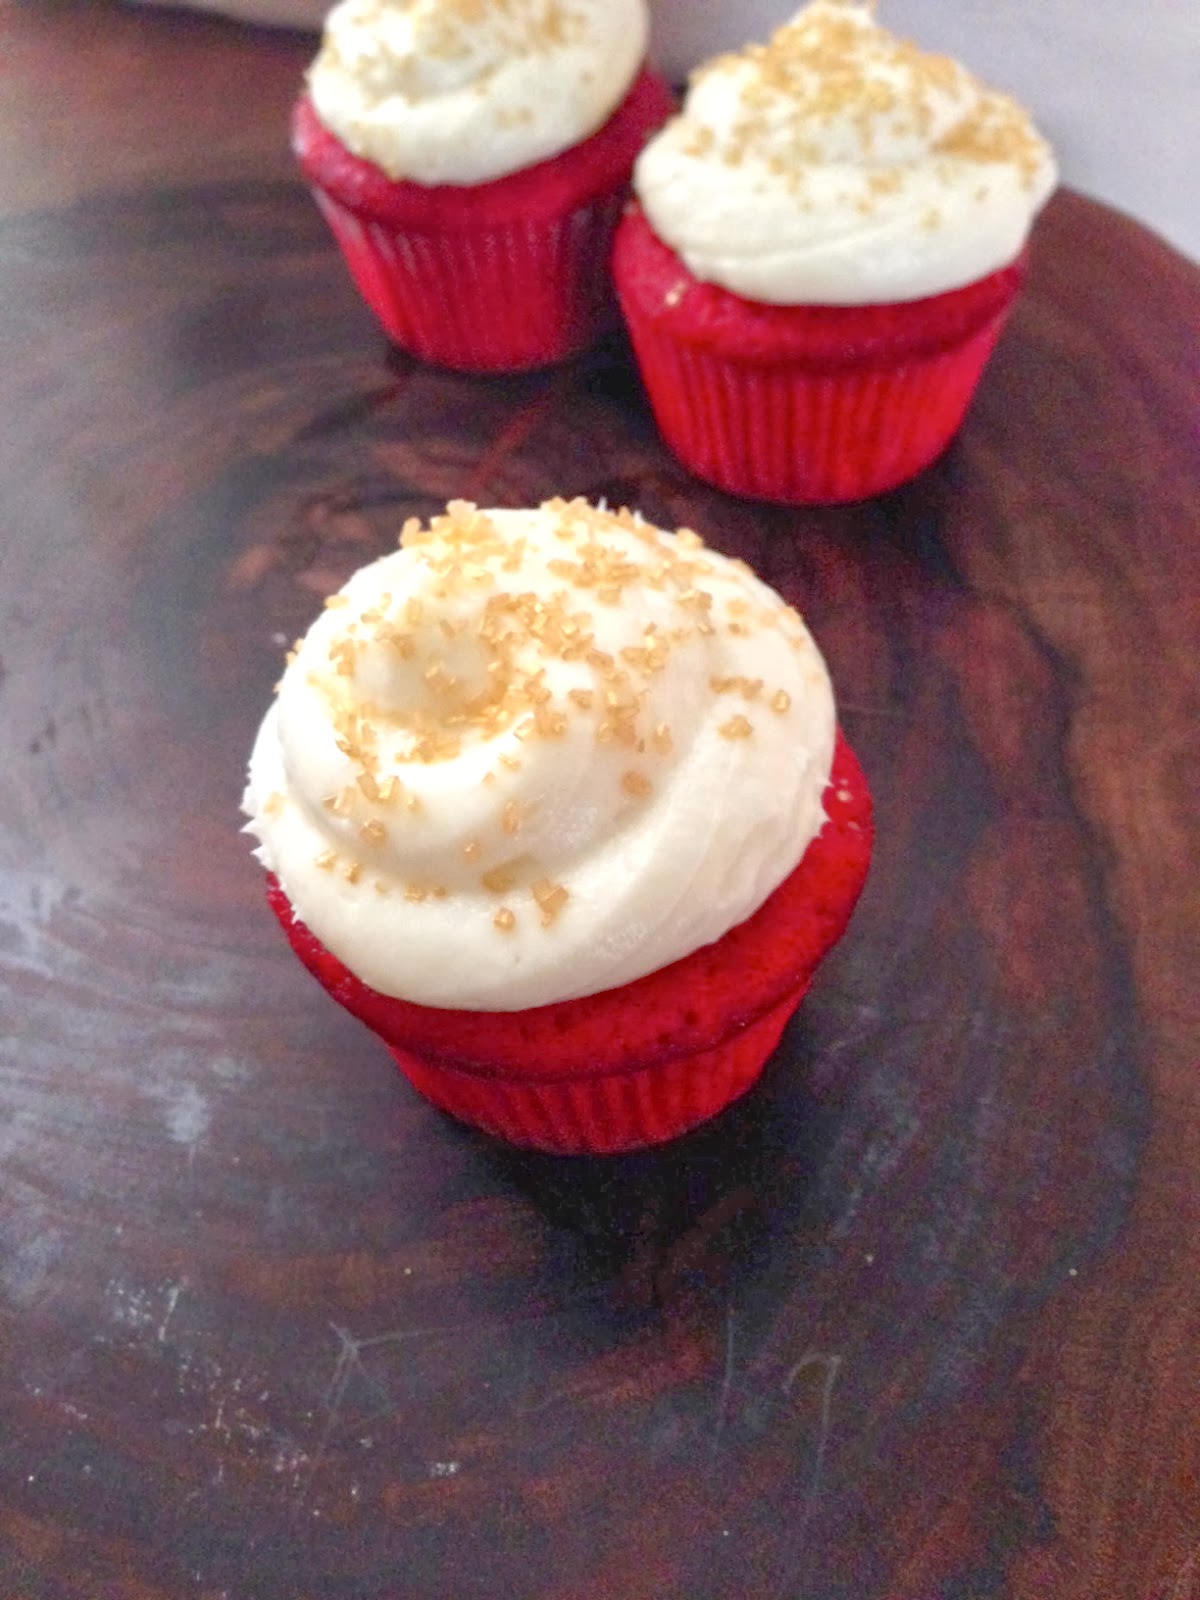
Indulge In {Red Velvet Cupcakes}


I don't even know where to start with this recipe. If I could truly put into words how amazing these red velvet cupcakes are, I would probably have a starting point. Unfortunately I don't, but I will try to do my best. First let me start by saying this is a recipe I got from my aunt and it is hands down my favorite dessert ever. To this day, I have not found another red velvet cake that has even come close to this.

There is very little I know about food in comparison to others, but if there is one thing I know about, it's red velvet cake. Others may try and tell you that all you need to do is add red food coloring to chocolate cake or that using vinegar and buttermilk will mess it up, but they are wrong. And, if someone ttys to put something besides cream cheese frosting on top, run the other way….fast! I'm going to stop rambling now, share the recipe with you, and let you judge for yourself. Hope everyone had a Merry Christmas and I can't wait to hear what you think!


:: Red Velvet Ingredients ::
*Makes 24 Cupcakes
2 1/2 Cups All Purpose Flour
2 Cups Sugar
2 Cups Wesson Oil
1 Cup Buttermilk (If you don't have buttermilk, mix 1 Tablespoon Vinegar with 1 Cup Milk)
2 Eggs
1 Teaspoon Cocoa
1 Teaspoon Vinegar
1 Bottle Red Food Coloring
1 Teaspoon Salt
1 Teaspoon Baking Soda
1 Teaspoon Vanilla

:: Red Velvet Directions ::
1. Cream sugar and oil in large bowl. Add eggs and mix till just combined.
2. In a separate bowl, combine vinegar, food coloring, and cocoa. Pour into sugar, oil and egg mixture and blend.
3. With your mixer on, alternate adding flour and buttermilk to the mixture.
4. Add baking soda, vanilla, and salt. Mix till combined. 
5. In a cupcake tin with liners, fill each with 1/4 cup of the batter. Bake at 350 degrees for 25 minutes. 
6. Let cool completely before icing.

:: Whipped Cream Cheese Frosting Ingredients ::
2 Blocks Cream Cheese, softened
1 Pint Heavy Whipping Cream
2 Cups Powdered Sugar
1 Teaspoon Vanilla Extract

:: Frosting Directions ::
*Tip: Place metal bowl and beaters into freezer for approximately 10-15 minutes before you make your frosting. This helps when whipping the cream. 
1. With your mixer on high, beat whipping cream until stiff peaks form. 
2. Add cream cheese and mix until combined. 
3. Beat in powdered sugar and vanilla extract. 
4. Pipe onto cooled cupcakes. 

12.12.2013

Indulge In {Nutella Crinkle Cookies}


Ever since I was a child, I've had an addiction to sweets. Cookies, cakes, ice cream, it didn't matter. If it could be considered dessert, I'm going to love it! But as I've grown I've realized I need to control my dessert intake just a bit. I'm typically really good about doing this throughout the year but always allow myself a pass during the holidays. Frankly, it's just too hard to turn down all of the homemade holiday treats. One of my favorite cookies is the recipe I'm sharing with you today. It's for Nutella crinkle cookies and they are out of this world delicious. I first made them for a holiday pot luck last year and they got rave reviews. Since then they have become my go to cookie recipe. So in honor of all the holiday baking, here's the recipe. Hopefully they will become one of your favorites too!

:: Ingredients ::
3 Cups All-purpose Flour
2 Teaspoons Baking Powder
1/2 Teaspoon Sea Salt
1-1/4 Cups Nutella Spread
4 Tablespoons Unsalted Butter, softened
1-1/4 Cups Granulated Sugar
1 Teaspoon Pure Vanilla Extract
1 Teaspoon Instant Hazelnut Cappuccino Powder
2 Large Eggs, Room Temperature
1/3 Cup Whole Milk
1 cup Confectioners Sugar


:: Directions ::
1. Combine flour, baking powder, and salt in bowl. With electric mixer on medium-high speed, beat Nutella, butter, and granulated sugar until light and fluffy, about 2 minutes. Add vanilla, instant cappuccino, and eggs and mix until incorporated. Reduce speed to low, add flour mixture and milk, and mix until just combined. Refrigerate dough until firm, about 1 hour.
2. Adjust oven racks to middle positions and heat oven to 375 degrees. Line three baking sheets with silpat or parchment paper.
3. Add confectioners’ sugar to bowl. One at a time, roll dough into 1-inch balls then roll in confectioners’ sugar. Place balls 2 inches apart on prepared baking sheets (12 cookies/sheet). Refrigerate first sheet of dough for 10 minute while preparing the second sheet. Bake cookies for approximately 8-10 minutes, switching and rotating sheets halfway through baking. Cool 5 minutes on sheets, then transfer to wire rack and cool completely. Repeat with remaining cookie dough.

8.29.2013

Indulge In {Espresso Topped Vanilla Bean Ice Cream}


I had never heard of this delicious Italian dessert before we were at this little gathering a couple of months ago. Ever since, it's been my go to dessert. It's simple and not so overly sweet so that everybody can enjoy.  Think of a root beer float but with a shot of espresso instead. To be honest, it's kind of perfect (If you like coffee, of course.) Want to mix it up some? Add the shot of espresso to a scoop of chocolate or dulce de leche ice cream. Bust it out at parties and take guests by surprise when you serve them a big bowl of ice cream served with an espresso shot pour right over top in front of them. Here's what you'll need...

:: Ingredients ::
1 Scoop Vanilla Bean Ice Cream
1 Shot of Espresso (Or 1/4 Cup Coffee)

:: Directions ::
Scoop ice cream into bowl and top with fresh brewed shot of espresso.  

6.06.2013

Indulge In {Rum Punch Granita}


This blog would be nothing if I wasn't honest with you. So in the spirit of being honest, this post started as rum punch pops. It clearly turned out to be an almost epic fail. In the process, I learned that making pops with an abundance of alcohol is just about impossible. But, I did learn that making granita with it is surprisingly easy and delicious. Because of the alcohol, you don't have to scrape it like a normal granita. It freezes nicely and makes a delicious, cooling summer dessert when accompanied by some fresh fruit. Serve it up after a backyard BBQ or a fun day at the beach. The best part is that when it melts, it turns into a yummy (ice cold!) cocktail. Here's the recipe..

:: Ingredients ::
*Makes 2 Servings*
1 oz Coconut Rum
1 oz White Rum
1 oz Dark Rum
1/2 oz Spiced Rum
3 oz Pineapple Juice
2 oz Orange Juice
1.5 oz Grapefruit Juice

:: Directions ::
Combine ingredients in a tupperware. Place in freezer and freeze for at least 24 hours. Using an ice cream scooper, scrape out serving. Top with fresh seasonal fruit and serve.

3.04.2013

Color Me {Glistening Gold}


All that glitters can be gold! Happy Monday. I hope everyone had a super relaxing weekend. We had the best time this weekend. Dinner with friends on Friday, a trip to Sweet Grass Dairy on Saturday, and a lazy day at home on Sunday. It may have been perfect. I also spent some time brainstorming about my next photo shoot for LPF Mag. I'm dreaming of a super girly party dripping in glitter, gold, and all things indulgent. Think champagne and dessert soiree full of happy girls and clinking glasses. It's sounds like the perfect party to me that all stemmed from a perfect weekend.

Have a great day!

11.01.2012

Indulge In {Mini Pumpkin Pies}


Halloween is over and it's the first of November. Holiday season is officially upon us! It's time to start preparing the house for holiday guests and prepping for your big Thanksgiving meal. Over the next couple weeks leading up to Thanksgiving, I'm going to be sharing some of my favorite sides to accompany your turkey. I wanted to start today with a throw back post of my favorite holiday treat, pumpkin pie. I made these last year and they were a huge hit. Instead of making one big pie, I love making individual size portions in cupcake tins. Each guest then has the option to top as they please with whipped cream, caramel, or both! Here's the recipe...

:: Ingredients ::

1 (15 ounce) can Pumpkin Puree
11 Ounces Soymilk
2 Large Eggs
1 Large Egg White
1 Teaspoon Cornstarch
3/4 Cups White Sugar
1/2 Teaspoon Salt
2 1/2 Teaspoons Cinnamon
3/4 Teaspoon Ginger
3/4 Teaspoon Clove
1 Teaspoon Allspice
3/4 Teaspoon Ginger
2 Unbaked 9 inch Pie Crust

:: Directions ::

1. Combine the first 4 ingredients in a large bowl. Mix until well combined.
2. Mix dry ingredients together in a separate bowl then add to wet ingredients. Blend until smooth.
3. Using a round cookie cutter, cut pie crust into rounds. Spray cupcake tin with non stick spray and place 1 pie round in a tin. Fill with filling.
4. Bake at 425 degrees for 15 minutes
5. Turn heat down to 350 degrees and bake 40-50 minutes or until an inserted knife comes out clean.
6. Cool and serve

9.25.2012

Party DIY {Paper Cone Wrappers}


Summer may be over, but I still find myself craving the sweet summer treat on warm fall afternoons. While ice cream socials may be behind us for the time being, there are still a million uses for the sugary waffle cone. Imagine them filled with fresh fruit for a breakfast gathering or dipped in chocolate served along side a mug of decadent hot chocolate. No matter what you fill them with, they are cutest when wrapped in a custom paper cone to match the decor of your event. This party DIY is super simple and makes a big impact for the little time it takes. Here's how to make your own!

:: Supplies ::
Patterned Scrapbook Paper
Ruler
Pen
Scissors
Double Sided Tape

:: Directions ::
1. Begin by measuring a single line 8" in length. From the end points of the line, draw 2 lines 7" in length on a angle so they meet in the middle.
2. Cut the triangle out.
3. Round off the top part (original 8" line) until the triangle is 5" in height.
4. Place double stick tape on the back edge of the triangle and wrap snugly around cone. Fill, serve, & impress!


8.30.2012

Indulge In {Chocolate Espresso Cake}


Today's post is going to be short and sweet my friends. The past couple of weeks have been crazy between traveling, having family in town and a busy work schedule. It has essentially left me no time in my kitchen which does not make me very happy. But, I do have a project on the horizon that will have me spending some much needed time concocting delicious treats. I wanted to share today a recipe that I plan on using for said project. While I tend to put my own spin on recipes, this one looks so good I may even follow it to a T. Here ya' go....


:: Ingredients ::
  • 2 tablespoons instant espresso dissolved in 1/4 cup of boiling water then cooled to room temperature
  • 1 1/2 cups Millet Flour
  • 2 tsp baking powder
  • 1 1/2 tsp baking soda
  • 1 tsp salt
  • 1/2 cup unsweetened cocoa powder
  • 1 cup raw sugar
  • 3 tablespoons of butter, unsalted at room temperature
  • 1 egg
  • 1 egg yolk
  • 2 tsp vanilla
  • 1/2 cup plain non-fat greek yogurt
  • 1 cup pumpkin puree
  • 1/2 cup low fat buttermilk
  • 4 squares (40g) of 70% dark chocolate, diced into 1/2 inch pieces
:: Directions ::
  1. Dissolve the espresso powder in boiling water and allow to cool while beginning the batter.
  2. Cut a circle of baking paper to fit the bottoms of two 8 inch baking pans.  Lay the paper in the pans and spray the sides with non-stick spray.
  3. Preheat the oven to 375 degrees.
  4. Sift together – flour, baking powder, baking soda, salt, and unsweetened cocoa powder
  5. In a bowl with high sides (such as a stand mixer bowl) mix the sugar, vanilla, and soft butter with an electric mixer on slow speed.  Add egg and egg yolk and increase mixer speed to medium and mix for about 3 minutes to allow butter and eggs to become fluffy.
  6. Continue to mix while adding yogurt, pumpkin, and butter milk mixing throughly between each ingredient.
  7. Mix in cooled espresso and blend throughly.  Bater should be quite liquid.
  8. With the mixer on low speed slowly add the dry ingredients 1/3 at a time.  When the dry ingredients are completely incorporated set aside the mixer and fold in the chocolate pieces with a wooden spoon or a spatula.
  9. Divide the batter between the two prepared cake pans.  Bake at 375 for 30 minutes.  Check for done-ness at 25 minutes with a probe or toothpick.  Cake is done when the center doesn’t jiggle and a toothpick or probe comes out clean when inserted into the middle of the cake.
Allow cakes to cool at least 15 minutes before removing from pans or cutting.  Allow cakes to cool completely before frosting.
*Image and recipe courtesy of Our Lady of Second Helpings

8.23.2012

Indulge In {Strawberry Pie}


I often find myself in the situation of heading out of town with food in the fridge that never got used that will most certainly go bad before I get back. Does this happen to anyone else? Call it poor planning  or life getting in the way of grand plans to eat at home for every meal, but it never fails. This past weekend, we were heading out for a couple days at R's parent's house with a two pound box of strawberries just hanging out in the fridge. After a quick call to R's mom, it was decided that we would find some use for the lingering strawberries. With the help of Google, we finally landed on strawberry pie. I've never had it before but let me tell you it's major delicious! Here's the recipe...

:: Ingredients ::
2 Cups Sugar
2 Cups Water
6 Tablespoons Strawberry Gelatin Mix
2 Pounds Fresh Strawberries
3 Heaping + 3 Regular Tablespoons Cornstarch
1 Pie Crust Cooked and Cooled

:: Directions ::
1. In a sauce pan, mix together sugar, strawberry gelatin, and cornstarch
2. Add water and heat over medium heat, stirring constantly to prevent burning, until thick and clear. Set aside and let cool completely.
3. Slice strawberries in quarters and set aside till gelatin mixture is cool.
4. Once cool, mix strawberries in with gelatin mixture. Pour into pie crust and put in fridge until ready to serve.

1.12.2012

Indulge In {Champagne Sorbet}

Last week I was reading an article on Today's Kitchen about what to do with left over Champagne from New Year's. One of the suggestions was to make sorbet with it. With an extra bottle lingering in my fridge, and a hankering for something sweet and delicious, I was off to find the perfect recipe to adapt. After stumbling though many a recipes, I came across this one on Simply Recipes that sounded divine. So with that, I was off to the store. Excited to try it, I got right to work. And after a quick mishap forgetting to freeze to canister to the ice cream maker, it was churning away. After patiently waiting, it was ready! And let me tell you, it was amazing. Crisp, light, and full of flavor. It could be my new favorite! You must try...

:: Ingredients ::

1 1/2 C Sparkling Wine or Champagne
1 C White Granulated Sugar
1 Tbsp Light Corn Syrup
Zest and Juice of 1 Lemon
Zest and Juice of 1 Grapefruit

:: Directions ::

{1} Combine Champagne, sugar, corn syrup and zest in a sauce pan. Bring to a vigorous boil so that sugar dissolves completely. Remove from heat.
{2} Strain into a medium sized bowl as to remove as much zest as possible. Strain juice of lemon and grapefruit into same bowl.
{3} Submerge bowl into larger bowl full of ice water until sorbet mixture is completely cooled. 
{4} If using an ice cream maker, follow maker instructions (Note: Mine requires me to freeze the canister for up to 2 hours prior to use. Mine only needed to churn for about an hour before becoming firm. While it was firm enough then, I transfered it to a freezer safe container and placed in the freezer to firm more.) If not using an ice cream maker, place in a freezer safe container and freeze till desired firmness. Remember to pull from freezer and scrape with fork occasionally so that it does not freeze into a giant ice cube!

Enjoy!


1.04.2012

Oh So Sweet {Hypnotiq Cupcakes}

Yes, that's right. Hypnotiq cupcakes. In my other life, I double as the drunken baker. And no, not because I bake drunk, because I incorporate flavorful alcoholic beverages into delicious not on your diet cupcakes. Per the request of my lovely sister this holiday season, the drunken baker made a return with scrumptious Hypnotiq cupcakes. It's one of my favorite liqueurs to bake with because it is light and flavorful. Intrigued? I thought so. That's why I shared with you!

:: Hypnotiq Cake ::

{1 C} White sugar
{1/2 C} Butter
{2} Eggs
{2 t} Vanilla Extract
{1 1/2 C} All-Purpose Flour
{1 3/4 t} Baking Powder
{1/2 C} Hypnotiq

  • Preheat oven to 350 degrees. Line a cupcake tin with wrappers or spray with non-stick spray.
  • In a medium bowl, cream together butter and sugar. Beat in the eggs one at a time then add the vanilla extract. 
  • Combine flour and baking powder in separate bowl. Add to the creamed mixture and mix well.
  • Finally, add the Hypnotiq and mix till smooth. 
  • Pour into cupcake tins and bake for 20-25 minutes. 
:: Hypnotiq Buttercream ::

{1 C} Butter
{3 C} Confectioner's Sugar
{1 t} Vanilla Extract
{2 drops} Blue Food Coloring
Hypnotiq to taste

  • Cream together butter and confectioner's sugar. When mixed, add vanilla extract, food coloring, and Hypnotiq. 
  • Note: Frosting should be stiff enough to pipe onto cupcakes. 
Enjoy! 

9.14.2011

So Sweet {Cake Bar}

Okay so let's talk cake for a minute. I'm kind of obsessed with cake. And by kind of, I mean totally and utterly in love with cake. Once, freshman year, I ate half a cake by myself. On my roommates birthday. This actually happened twice. I ate another half a cake on my other roommates birthday. Thankfully my third roommate's birthday was over Christmas break. Otherwise, I may have gained the freshman 50. So anyways, given my obsession with cake and my obsession with bars, I have a new obsession with cake bars. It's kind of like a fat kids dream. Imagine a bar with different flavors of cake, different flavors and types of icings, fillings, toppings, infusions, etc. The list of the cake bar accouterments could possibly go on forever. Therefore, I will leave you with three words to remember. Cake. Bar. Deliciousness. 

You can thank me later... 

9.08.2011

Delightful Dining {Sweet Cinnamon Biscuits}

Hopefully, your mouth has already started watering. But, if it hasn't already, forewarning, it's about to. First, let me tell you what this actually is. This delectable treat you are feasting your eyes on is a sweet cinnamon biscuit topped with warm cinnamon apples. And holy moly if it is not the best damn biscuit you have ever had, then you have had some damn good biscuits. Well last week, Paula Deen informed me that September is national biscuit month and clearly that meant that a batch of biscuits were in my future (and yours!).  But, these ain't your momma's biscuits. Let me tell you what we have going on here...

For the biscuits...
{1} 2 1/4 C Bisquik mix
{2} 2/3 C plus a dash of milk (I used Vanilla Soy instead of regular)
{3} 1/2 C cinnamon sugar (I mixed my own. I would say the ratio is about 2:1 sugar to cinnamon.)
{Instructions} Preheat the oven to 450. Mix all ingredients in a bowl. Place a sheet of aluminum foil on a cookie sheet. You now have two options. You can either roll it out and cut with a cookie cutter, or you can do what I did. Make drop biscuits. Take a spoon and just dollop it on to the cookie sheet. Bake for 8-10 minutes. 

For the apples...
{1} 4 Granny Smith apples
{2} 1 C cinnamon sugar
{3} 1/3 C water
{Instructions} Peel, core, and cut your apples into bite sized pieces. Combine apples, cinnamon sugar, and water in a medium sized sauce pan. Bring to a boil. Once boiling, cover, reduce to a simmer and simmer for 10-15 minutes, until apples are soft and sauce is thick. 

For assembly and enjoyment...
{1} Cut your biscuit in half
{2} Ladle cinnamon apple over the biscuit 
{3} Eat and enjoy!

8.23.2011

This Party Inspired By {Sprinkles}

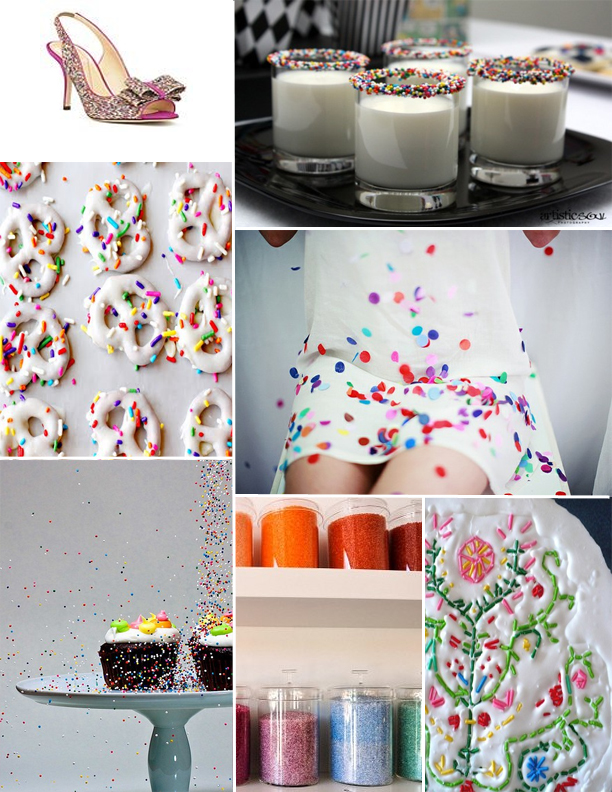
Do you remember when you were young and a scoop of ice cream or a slice of cake wasn't the same without the sprinkles? It completed the treat. Well, the coolness of sprinkles has returned. I mean hello, do you see this cake that is embroidered with sprinkles? Talk about amazing! Or, look at that sprinkle bar. I love it! Seriously, I can't stop gushing. I love the idea of passing around shots of milk rimmed in sprinkles to your guests as the night is winding down. Add a warm chocolate chip cookie and it would be perfect! 

Images: (Row 1) 1, 2 (Row 2) 1, 2 (Row 3) 1, 2, 3

7.14.2011

Dining Uncorked {Marshmallow Goodness}


This past weekend I took a little time to experiment with fun, easy desserts! I've figured out recently that when it comes to desserts, people don't want  a huge serving anymore. They just want something that they can have a bite of and completely enjoy! This started out as a bite size s'more. A marshmallow, dipped in chocolate and rolled in graham cracker crumbs. It was good till R. decided to kick it up a notch and heat up some peanut butter. It then evolved into utter deliciousness. Imagine a Reece's Cup with a graham cracker crust and marshmallow center. That's exactly what this was and it was out of this world amazing! I suggest you try ASAP!

Ingredients:
-Chocolate
-Peanut Butter
-Marshmallows
-Graham Cracker Crumbs

Directions:
-Heat the chocolate until melted. I used one of those little tubs designed for melting.
-Heat the peanut butter for appx. 30 seconds or until warm and stirable.
-Pour the graham cracker crumbs into a bowl
-Dip one side of the marshmallow in the chocolate. Dip the other side in the peanut butter.
-Dip one side of the marshmallow into the graham cracker crumbs and enjoy!