Showing posts with label halloween. Show all posts

10.30.2013

Party DIY {Skull Adorned Goody Bags}


Here's how Halloween goes every year at our house. I buy bags of candy the week of Halloween, put it in a big bowl and sit on the couch waiting for kids to come. Without fail, every year, we get 5, maybe 6, trick-or-treaters who take what I consider to be more than their fair share and Rob and I end up eating the rest. This year I've decided to put an end to that problem. This year I bought one bag of candy that I know we won't eat and tied up 2 pieces per trick-or-treater in a small cellophane bag. Genius right? I sure think so. This way I have just enough and a kid can't stick his or her hand into the bowl pulling out 10 pieces of candy each. Problem solved…or so I hope. The reason for this post though is not indulge you in my trick-or-treating troubles but to share the cute little bags with you. After making them, I realized this was a great idea not only for yearly trick-or-treaters but also for giving goodies to friends, co-workers, or even your child's school class. It works for more than just Halloween too! Tie up homemade cookies during the holidays with a cute little ornament or a birthday treats for a friend with a few candles to blow out. The concept of tying the bag with an appropriate object let's the recipient know you put some thought into your gift while keeping the cost on your part down. Here's the how-to on the Halloween version…

:: Supplies ::
Mini Plastic Skulls
Twine
Hot Glue
Cellophane Bags filled with Candy of Choice

:: Direction ::
1. Place a line of hot glue across the back of the scull.
2. Center the skull on an eight inch piece of twine.
3. Once dry, tie around candy bag.

10.28.2013

Color Me {Halloween Horror}


Happy Monday dolls. I hope everyone had a relaxing weekend. Halloween is coming up this week and we spent the weekend getting in the spirit from decorating the front of the house to finally buying our pumpkin. All in all it was a pretty spirited couple of days that has me really excited to see all the trick-or-treaters on Thursday. To continue the holiday fun into the week, I put together a little board of spooky inspiration. Full of dark and doomy black with splashes of orange, this board is enough to inspired costumes and last minute bashes alike. Whether you've had your plans for months or are just now making them, I hope you have a scare-tastic week!

10.30.2012

Play Dress Up


Hi there! Halloween is tomorrow and I'm getting excited to see all the amazing characters that knock on my door. I'm hoping for a few witches, a mermaid, some princesses, and super heroes of course. While I'm sure all the kids have has their costumes picked out for months, I still haven't figured out mine. A little last minute I know but life has been a bit crazy. Therefore, I have compiled a list of the best easy last minute costumes. If you're in the same boat as me, I hope this helps! 

1. Jellyfish: It can be as simple as wearing all white and attaching white streamers to the inside of an umbrella. Carry the umbrella over your head and you are one super cute sea creature!

2. Holly Golightly: The beloved Audrey Hepburn character is my favorite go to. A little black dress, black kitten heels, a fancy updo adorned with a tiara and a string of pearls around your neck seals the deal making you the best dressed movie star on the block.

3. Rosie the Riveter: A chambray shirt paired with a pair of jeans and a red bandana will instantly turn you into this cultural symbol of female strength from World War II.

4. Frenchman: Black jeans, a striped shirt and a red scarf are all you need to represent the romantic country of France. Add a baguette and a bottle of wine (my favorite!) to complete the look. Maybe you can even draw on a curly mustache for an added kick!

10.26.2012

Weekend Warriors {10.26.12}


Happy Friday y'all! We are finally getting a "cold" front this weekend and by Sunday, temps are expected to be in the 70s. That may seem like warm spring time weather to most, but down here it's just down right chilly. In honor of the fall like weather and holiday weekend, I've gathered a list of five activities and celebrations worthy of your free time this weekend. Here's what should be on your agenda!

1. Build a Bonfire: Nothing beats sitting outside in the the cold weather around a warm fire. Throw in a bag of marshmallows, some chocolate, and graham cracker halves and you've got the best Friday night party around!

2. Wear a Costume: Halloween is a few short days away and weekday celebrating is out of the question for me. If it is for you too, throw on your costume and host a spooky gathering.

3. Carve a Pumpkin: If you are anything like me, life has been too busy to even think about carving your pumpkin. I got mine Wednesday night and I'm excited to finally carve something especially scary (or cute!) into it this weekend. I also can't wait to roast the seeds and make a yummy fall snack!

4. Bake a Treat: Baking has to be one of my all time favorite fall activities. There is just something about a warm sweet treat on a cold evening that can't be beat. Try anything pumpkin, cinnamon, or apple flavored for the perfect fall indulgence.

5. Catch Up With Old Friends: It's been on my list of things to do for awhile now and I'm excited to follow through on it this weekend. With extra free time on Sunday, I plan on getting comfy on the couch and having a good chat.

What's on your agenda this weekend?

10.23.2012

Party DIY {Itsy Bitsy Spider}


Halloween is a mere week away and it's time to put the finishing touches on all those Halloween parties. While the scary details like ghosts popping out of dark hallways and spooky black punch are a given, it's time to concentrate on the little details that will make guests say wow! For this DIY I wanted something spooky in spirit with a handmade touch that didn't break the bank. This did just that. The rubber spiders I found in an 8 pack at Wal-Mart for $1.47. The rest of the supplies I had on hand in my craft bucket. After cutting some kraft paper down to size (3x2), I was off drawing spiderwebs in the corner and hot gluing spiders to them. These are great because they can be used in so many ways for your party. Try them as labels for food, place cards, or drink tags. Here's the step by step on making them for your party!

:: Supplies ::
Rubber Spiders
Hot Glue
3"x 2" Kraft Paper Pieces
Black Sharpie

:: Directions ::
1. Begin by drawing a line out of the center of the top left corner. Draw another line from the corner splitting the difference between the middle line and the edge of the paper. Repeat on the other side of the middle line. Draw a few more for a full looking web.
2. Starting near the corner, connect the lines with a slightly upward curved line that peaks at each line. Continue down the web forming rows.
3. Place a dab of hot clue on the back of the spider and adhere to paper.
4. Write each person's name or food item in the bottom right corner.

Have a great Tuesday!

10.09.2012

Party DIY {Halloween Ghosts}


Last week I asked you all to pick your favorite spooky Halloween decor for a DIY version. After a couple days of voting, the giant ghosts proved victorious. The original ghostly image featured a haunting ghost hanging from a giant tree. With a lack of trees in our front yard, I decided to use it as a bit of inspiration and make a version more to scale for people like me with small areas for decorating. These ghost yard decorations are attached to a wood dowel rod making them easy to stick wherever you have the space. Here's the how to...

:: Supplies ::
(1) Twin Size White Sheet
(2) 2 ft. Wood Dowel Rod
(2) Small Styrofoam Balls
Scissors
Hot Glue Gun
Sharpie
Black Paint
Paintbrush

:: Directions ::
1. Cut the sheet in half width wise creating 2 square pieces. Fold each piece in half.
2. Hot glue the styrofoam ball to the center of each sheet.
3. Insert the wood rod into the ball.
4. Lay the "ghost" on it's side and draw a face using the Sharpie. Fill in with black paint. Let dry and place accordingly outside.

Have a scary good Tuesday!


10.03.2012

Party DIY {Halloween Decor Redo}


Half way through another week and it's time again for you all to pick which spooky Halloween decor you want me to remake this weekend! I know yesterday I said that decorating was on hold for another week or so, but a girl can't help but plan right? I can't decide between this scary ghost for the front yard, haunting black rose wreath for the front door, or chalk board pumpkins for around the house. Let me know which is your favorite and I'll give you the step by step next week!


10.02.2012

Center of Attention {Broom Stick Escort Cards}


After last year's fiasco of the rotten pumpkin on the front porch, Rob has put me on a strict no pumpkin carving rule until 14 days or less before Halloween. Naturally, I'm not a fan of being put on decorating restrictions. While I understand that all types of bugs coming out of the pumpkin right by our front door is not exactly a good (or sanitary) thing, I still don't like it. So, it has me dreaming of all the ways I'm going to decorate come mid October. With painting pumpkins and barrels of hay already on the short list, I've got room for some more epic ideas to add to my Halloween and fall decor. One of my favorite ideas so far are these broomstick place cards. What a clever way to display names and incorporate a bit of witchery. I love that they can be used for Halloween parties or be carried over to general fall gatherings. I can't wait to make them and bust them out shortly!

Have a great Tuesday!

10.31.2011

Happy Halloween!

ghost-costume_300.jpg
Happy Halloween! Halloween is all about getting dressed up and celebrating the spooky goodness. And hopefully by this point you have all figured out what you are going to dress up as. But if not, I'm here to help! Personally, I still have no idea what to wear while handing out candy to all the kids in the neighbor hood. But, I have a feeling this list of last minute easy costumes from Real Simple is bound to help me (and you) figure out what to wear!

  • A green clown wig + a schoolgirl outfit = Broccoli Spears
  • A plastic laundry basket with holes cut out for legs + white balloons + a shower cap = Bathing Beauty
  • A white dress + a pipe-cleaner halo + leaves in her hair and “dirt” on her face = Fallen Angel
  • Black clothes + yellow electrical tape down his torso + toy cars + Velcro =Highway
  • A pig nose + a blanket = Pig in a Blanket
  • A blue T-shirt + cotton balls + tape + a water gun = Partly Cloudy With a Chance of Rain
  • A polo shirt + khakis (or madras shorts) + a name tag = Jay Crew
  • A clear umbrella (preferably dome- shaped) + party streamers or metallic ribbons = Jellyfish
My personal favorite is the jellyfish! So, what are you plans for Halloween? ARe you staying in and handing out candy like me or heading out on the town? And better yet, what are you goign to dress up as? I'm dying to know!

xo


10.25.2011

The Art of the Pumpkin

Last week I showed you mine and R's pumpkin. And while for us, it was quite the artistic endeavor, compared to these people, our pumpkin looked like it was carved by a 5 year old. And I only say 5 year old because a 3 year old should probably not be handling a knife. Anyways, if you haven't carved your pumpkin already, here are some done by some people much more talented than myself. I hope these people inspire you and that maybe your pumpkin this year is on this artistic a level. Already carved your pumpkin? I want to see! So tweet me a picture @eventsuncorked. 

xo

10.24.2011

This Week I Feel...Spooky

Happy Halloween! Almost. Halloween is exactly a week away and whether you are throwing your party this weekend or on Monday, it's time for a little inspiration for your spookiest bash yet! Set the spooktacular scene with spider webs draped over all the surfaces in your house. Turn off all the lights and light the way by candlelight. My favorite part about a Halloween bash though is all the creepy things you can do with your food! I love that skull wrapped in prosciutto and the viles filled with red shots and labeled as blood. Even better, the cupcakes with shards of "glass" and dripping in "blood"!  How are you celebrating Halloween? Party or Trick-or-Treating?

xo

*Images: {Row 1} 1, 2, 3 {Row 2} 1, 2, 3 {Row 3} 1, 2, 3

10.21.2011

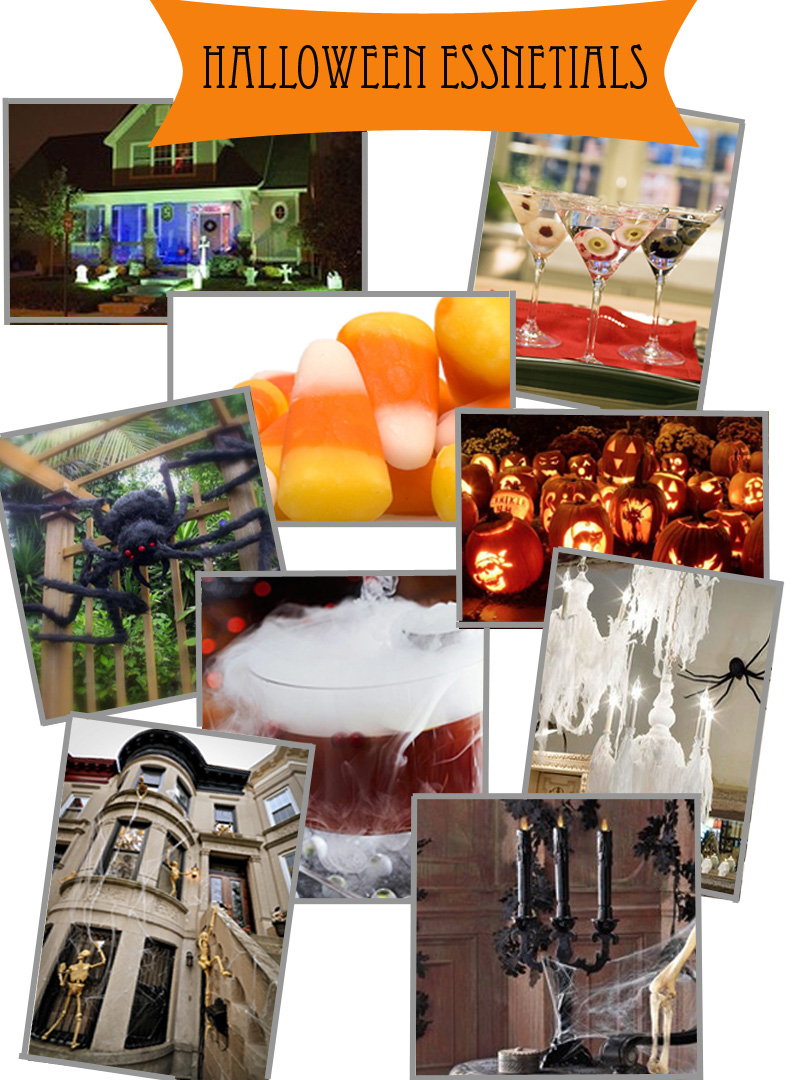
Party Essentials {Halloween}

Halloween is a week from Monday which can only mean one thing...Halloween Party! And while I'm giving you all the Halloween inspiration you need on Monday, today I wanted to give you my Halloween party essentials. No matter if your party is meant to be scary or just fun, here's what you need! 

{1} Green Light Bulbs: Whether you put them outside or in, they give off an erie glow perfect for the occasion. 
{2} Eyeball Martinis: Thank you Martha Stewart for supplying me with an ever so creepy but utterly delicious Halloween favorite! 
{3} Candy Corn: Clearly everyone's favorite treat of the season. It's a total must!
{4} Giant Fuzzy Spider: Spooky and unrealistically large. Perfect to scare, but not to bad.
{5} Pumpkins: Duh. What's Halloween without pumpkins? Carve them for outside or use them as centerpieces or maybe even as an ice bucket! 
{6} Dry Ice: Need I say more? It gives off a spooky smoke so tease your guests by icing their eyeball martinis with it.
{7} Spiderwebs: To go with that giant spider of course! 
{8} Skeletons: Personally I prefer black, glittered skeletons that hang on my front door. But, if you can manage to make them look like they are climbing up your building, then props to you because that looks pretty cool!
{9} Black Candles: Because white ones just aren't creepy. 

What are you Halloween party essentials? 

10.19.2011

The Pumpkin Patch

It's pumpkin time! A couple weeks ago, R and I made a trip to the pumpkin patch down the street to pick out the perfect pumpkin. And after checking each pumpkin we finally found one that was perfectly round with only one little bad spot. It was the perfect size and was bound to look perfect on our front porch! 
After lugging it (plus 3 cute little pumpkins) home, it was time to carve. Scroll below to see our super scary pumpkin! And, if you are wondering what to do with the pumpkin guts, come back tomorrow and I'll show you! 
Happy Halloween!