Showing posts with label diy. Show all posts

5.15.2013

Party DIY {Picnic Blankets}


No picnic is complete without the perfect blanket. It's what keeps you comfy for the day and sets the mood for the whole day. The perfect picnic blanket should big, soft, and most importantly stylish. It should represent you and the feel you want for the afternoon. Whether it be bohemian, nautical, or preppy, the look is key to creating your perfect picnic. The best way to do this is to make your blanket yourself. I've rounded up for you today four of my favorite DIY picnic blankets from some of my favorite bloggers. You've got a fun diamond neon print from Design Love Fest, a confetti-esq geometric from Studio DIY, a floral number from 333 Park, and a lovely chevron from Twig & Thistle.  All are beautiful in their own right and I wish I had the time (and storage!) to make my own version of each. What would your ideal picnic blanket look like?

4.03.2013

Party DIY {Ribbon Wands}


Two DIY's in a row? So unusual. But, I've been feeling a bit more creative with the change of seasons. For the longest time now, the big trend in wedding send offs has been the sparkler. I get it, they're fun and make for a great pictures, especially at night. But, like every trend, there comes a time for a new one. Said new trend is the ribbon wand. I remember playing with something similar as a kid and having a blast! I would dance around twirling the wand until I couldn't stand it any longer. Now, as an adult I wish I could go back to that time, and I can with these wands. Not only are they a dazzling send off but fun for party guests of all ages to play with. Plus they are easy enough to make yourself and customize for you soiree. Here's the step by step on making your own!

:: Supplies ::
1/4 in. Dowel Rod
Eye Hooks
Scissors
Assorted Ribbon
Wood Saw
Fine Sandpaper

:: Directions ::
1. Using your wood saw, trim your dowel rod into 12" sections. (With a standard rod, you should get 4 pieces)
2. Sand the edges of each new rod to ensure that splinters are gone.
3. Take your eye hook and begin to twist it into the end. (Be sure to center it!)
4. Trim your ribbon into 2 ft pieces. Gather four pieces together and string through eye hook, tying into a knot around the hook.


Have a creative Wednesday!

4.02.2013

Party DIY {Spring Napkin Rings}


I've recently been inspired by things I find around my own house. Things that seem so out of the ordinary and could never be anything beautiful or party appropriate. It started one day when I was reminiscing about the fun crafts from elementary school made from things like paper plates, paper towel rolls, plain white paper and more. We used such creativity as a kid and it has seemed to disappear over the years. I decided to bring it back though. I wanted to take your average brown toilet paper (or paper towel) roll and turn it into something bright, fun and perfect for everyday or party days. The outcome, colorful patterned napkin rings. I instagramed a sneak peak over the weekend and am glad to share the step by step DIY with you today. Here you go...

:: Supplies ::
1 Toilet Paper Roll
Ruler
Scissors
Pencil
Assorted Acrylic Paint
Flower Appliqué

:: Directions ::
1. Begin by measuring 1" increments on the roll. Mark with a pencil. Trace line around roll.
2. Cut around lines. Trim rough edges.
3. Paint a base color on each ring. Let dry. With a second color, paint a pattern such as lines or dots. Let dry. Adorn with self adhering flower applique.

11.23.2012

A Crafted Holiday {Handmade Christmas Cards}


How stuffed are you today? The day after Thanksgiving is one of those that I like to indulge just a big more and really enjoy all the leftovers. It's also a day where I like to begin all of my Christmas preparations. I can't believe it's that time of year again, but it's time to bust out the holiday decorations and transform my house. This year I have decided to pose a little challenge to myself, see how many gifts I can make instead of buy. I'm hoping I'll be able to create some much more personalized gifts that will mean a bit more to the recipient. I've also decided to carry this challenge over into my decorating. Instead of buying my decorations this year, I want to see how many I can make on my own, and I plan on sharing every step of it right here with you.

To begin the crafted holiday, I opted to make our Christmas cards this year instead of using a pre-made format found online. Seeing as Rob is not the one for pictures, this was the perfect option for us, I got to craft and he didn't have to dress for a picture. I can't wait to send them out and see everybody's reaction. Here's how I made them...

:: Supplies ::
Kraft Paper Cards
Single Hole Punch
Baker's Twine
Scissors
Double Sided Tape
Hot Glue
Rhinestones

:: Directions ::
1. Begin by taking your single hole punch and punching a half hole in the top center of the card.
2. Punch seven half holes along the bottom edge of the card centering the top hole in the line.
3. Take a small piece of double sided tape and place it on the back side of the top half hole on the inside of the card.
4. Using your baker's twine, begin at the top of the card and wrap the twine through each of the bottom seven holes securing the end of the twine on the tape on the inside of the card.
5. Place a dab of hot glue on the back of the rhinestone and place at the top of the tree on the front of the card.
6. Write your message on the inside, sign, and send.

Hope you all have a great weekend!

8.22.2012

Reader's Pick {Cake Stand Remake}


My latest favorite party accessory is the cake stand. Useful for more than just displaying cakes, I love to use them as a base for bouquets in the center of the table or even as a platform for signs around the room. You can create an amazing dessert table display by mixing together cake stands in varying shapes, sizes and colors holding things such as cupcakes, cookies, mini pies, chocolate covered marshmallows and more.

This weekend I am going to recreate one of these high end stands in a fun DIY for your next gathering. But, the key is, I'm leaving the choice up to you. Which one of the above cake stands do you want to see recreated?

7.10.2012

Center of Attention {Flag Table Numbers}


Ever since Pinterest came along, it's been my favorite place to search for inspiration from nightly meals to color inspiration to centerpieces. Well, when I stumbled upon this image of flag table numbers, I knew immediately that I had to recreate them. They are vibrant, fun, and customizable to your theme. Whether you want to mix match patterns in bright colors or opt for a subtle neutral like gray, you can't go wrong with these flags. Never one to turn down a craft project, I was ready to jump into this one feet first. So with supplies in hand, I got to work. Here's how to make them for your next get together...

:: Supplies ::
Paper of Your Choice (I chose turquoise and peach)
Flag Stencil (Made by creating 2 triangle of desired equal size and placing ends together)
Scissors
Paint Color of Your Choice (I used white.)
Wood Skewers
Double Sided Tape
Pencil
Thin Paint Brush
Number Stencils (optional)

:: Directions ::
1. On the reverse side of your colored paper, trace your flag stencil.
2. Cut out each flag and fold in half matching the ends. Trim any over hang.
3. If using a stencil, trace the number onto each side of the flag.
4. Paint each number. It will take a couple coats if you use a lighter color.
5. Once you have painted each side and they are both dry, open the flag, place a strip of double sided and the wood skewer at the seam. Fold it back in half and add additional tape where needed to keep the flag closed.

6.19.2012

Party DIY {Mercury Glass Votives}

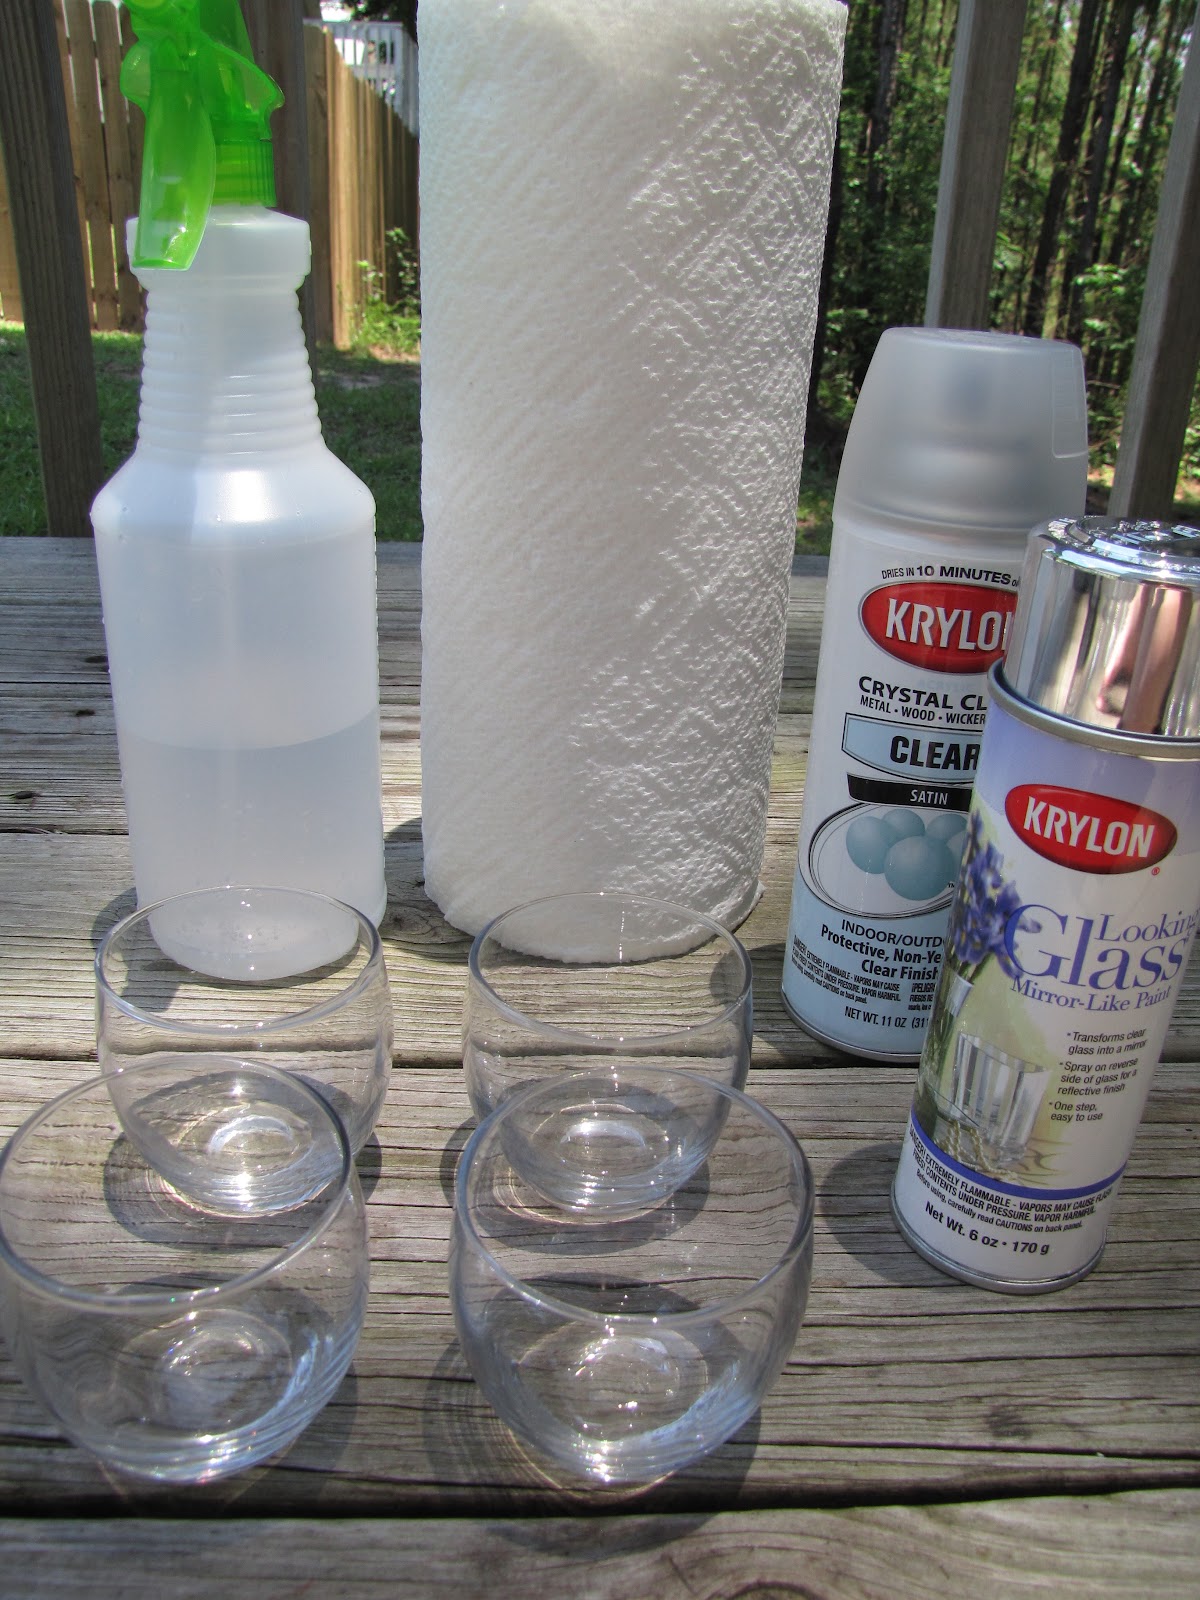
There is nothing I love more than a weekend DIY, especially when I'm creating for someone else. A friend of mine is getting married in just a short while and I have taken on the task of helping her fulfill her vision. One touch she just can't get enough of is mercury glass. Instead of paying the price to buy all the votives we would need, I decided to get a little crafty and make them myself. Turns out, achieving this look is pretty simple! Here's how to make your own mercury glass pieces!
:: Supplies :: 
Spray bottle with 50/50 mix of water and vinegar
Paper Towels
Votives
Krylon Looking Glass Spray Paint
Clear Spray Paint
:: Directions ::
1. Spray the inside of each votive with five light coats of the Looking Glass paint. Spraying the light coats will keep the paint from running down the inside of the glass and creating streaks. Be sure to wait 15-20 seconds before spraying each coat.
2. After you have sprayed each votive with 5 coats of the spray, spritz the inside of each votive with the vinegar and water mixture. 
3. Take a paper towel dampened with the vinegar water mixture and begin to dab the inside of each glass. Be sure to dab and not wipe as the vinegar will take all the paint off if you wipe to much. At this point you can take a little creative license. You want to be sure to leave some of the silver paint but want to create areas where the light of the candle can shine through. 
4. After getting each votive looking just like you envisioned, do one last light spray of Looking glass so the translucent parts are completely clear. 
5. Coat the inside of each votive with the clear protective spray and let sit to dry for at least an hour. After which you are free to use for decoration as you choose!

Note: Do not use real candles as the spray paint is very flammable. Flameless votives are required. 


5.29.2012

Makin' Waves

Hi sweets! As promised, I'm back today with a fun DIY. It's not exactly event related but it's a great way to escape from the everyday and just be creative for a while. If there are any two things I love more than events, it's making a house a home and the beach. 

On a weekend getaway back home, my Dad, R and I went micro brewery hoping around the Jacksonville Beaches. One of our last stops was this rustic, beachy spot called The Green Room. I feel in love with every bit of decor they had. From the pallet boards lining the wall, to the pour concrete bar top and floor, the wine barrels for cocktail tables, I was smitten the moment we walked through the door. One of the pieces they had hanging on the wall especially caught my eye. This collage of waves painted on pallet boards was so eye catching and one of a kind. What I loved most about it was that you could tell it was handmade and not printed or mass produced. After a bit of begging trying to get the bartender to sell it to me, I finally settled for a picture and knowing that I had an afternoon craft ahead of me. 

So, with some spare pallet boards, a measuring tape and a wood saw in hand, it was time to get to work. After determining my measurements and gathering the rest of my supplies, I was ready to paint. Not usually, the artist, what made this project so great for me, is that imperfection was actually the key. It's what makes it so unique and what makes me so proud to hang it on my wall. Here's the measurements and supply list...

:: Supplies ::
Paint in the colors of your choosing (I choose 3 shades of blue and a yellow)
Variety of brush sizes
Pallet Boards in the following measurements...
       (1) 24" piece
       (3) 18" pieces
       (4) 8" pieces

Create! 


12.07.2011

Let's Get Crafty {DIY Wreath}

Ever made your own Christmas wreath? Neither had I till this past weekend. Jonesing for some long over due craft time, I decided to get crafty this weekend and take our Christmas tree trimmings and turn them into a wreath for the front door. The best part about doing this is you can make the wreath as big or as small as you like. And seeing as my Christmas decoration philosophy is the bigger the better, I went big. Here's what you'll need to do to make your own!

::Supplies::
{1} Tree Trimmings
{2} Scissors
{3} Zip ties

::Instructions::
{1}Gather your tree trimmings and lay them flat.
{2}Begin to layer branches
{3}Secure branches with zip ties
{4}Continue to layer and secure until you have a line of desired length. Note that the longer the line of secured branches the bigger the wreath. 
{5}Take the two ends of the branches and join together securing with a zip tie to form a circle.
{6}Trim branches to make a more concise circle.  I had to trim most of mine from the center of the wreath because it looked a bit just like a solid circle and not a wreath.
{7}Attach a bow and hang from the front door!

What is your favorite holiday diy? Let me know. I'd love to try it out! 

9.09.2011

Let's Get Crafty {Wine Bottle Tiki Torches}

Why yes, I did just say wine bottle tiki torches. I mean, hello, talk about the most amazing way to keep annoying bugs away. Plus, they are so easy to make and you don't have to worry about having a place to stick the base of the torch in the ground. Oh and let's not forget to mention that it's cheap. Cheaper than buying a brand new tiki torch. Yes, the wine it probably a little expensive, but if you are like me, you have the wine already and a recycling bin full of empty wine bottles. Okay, so here is what you are going to need...

{1} An empty wine bottle
{2} Tiki brand replacement wicks
{3} Tiki brand torch oil
{4} 1/2" x 3/8" copper coupling 
{5} 1/2" teflon tape

And here is what you are going to need to do...

{1} Take your wine bottle and peel the label off. I have determined that the best way to do this is under hot water in your sink.
{2} Take your copper coupling (1/2" side up) and slide it over the wick leaving approximately 1/2" of wick at the top.
{3} Use the teflon tape to tape the wick in place on the 3/8" side. It should be thick enough so that it will fit securely in the bottle.
{4} Fill the bottle with oil until it reaches the curve in the bottle.
{5} Put the secured wick in the bottle, grab a lighter, and enjoy a bug free evening!