11.30.2011

This Party Inspired By {Holiday Sparkle}

Tis the season for holiday parties! During this time everybody's social calendar seems to fill with holiday parties galore. Whether you are hosting one or simply a doting guest, the focus is always on the decor. And with so many on the calendar, it is bound to get a little repetitive. So maybe you should be the one to mix it up. I love the idea of doing holiday sparkle. Fill the room with golds, silvers, pinks and glitter! If the things people associate with the holidays are there, it really doesn't matter the color. Roll branches from the yard with glitter to make an eye catching centerpiece or fill clear ornaments with confetti. Add vases of ornaments and brightly colored tassel to mix it up. I love the idea of hanging ornaments at various lengths in front of the window. Looking for a little interaction? Have clear ornaments, bowls of glitter, and ribbon and let guests make their own ornament for their tree! Frankly, with glitter involved, the possibilities are endless!

What are your holiday party plans this year? Hosting or attending?

11.29.2011

The Perfect Gift {The Entertainer}

Every Christmas I always ask for the same things. New clothes, gift certificates, and electronics. But, my favorite thing under the tree is always great pieces for entertaining. Nothing makes me happier than unwrapping a chic little serving tray or a well designed wine decanter. It seems that over the years, all the pieces have began to look about the same. But this year, retailers are raising the bar. Here are 5 amazingly designed pieces that every entertainer will love to unwrap...

{1} Anthropologie Beverage Dispenser: Between the interesting shape and the rustic lid, I'm dying over this beverage dispenser. I've been eyeing it for months now and I'm hoping to add it to my collection of serving pieces ASAP.

{2} Slate Cheese Board:  This slate cheese board from Terrain is ultra chic and modern. My favorite part though is you can label the cheeses with chalk!

{3} Tasting Decanters: These tasting decanters are great for a wine tasting party. Each one is labeled and shaped for a specific type of wine. The set includes decanters for a merlot, cabernet, pinot grigio, and chardonnay.

{4} Tasting Plates: I love snacking on bread and dipping oils. But everyone seems to have a preference on dipping flavor. This plate will make everybody at your party happy. With four dipping dishes, you can put out everything from bruschetta to olive oil and balsamic vinegar to oil with dried herbs at the same time. 

{5} Whisky Stone Glasses: During the winter months, I love a good whisky drink. But, I hate when the  ice melts and dilutes the drink. These glasses made of soapstone and just need to be put in the freezer 4 hours before entertaining. When you are ready to fix a drink, skip the ice, grab a glass, pour a drink, and enjoy! These glasses are great for more than just whisky too. Try sipping vodka or any other spirit out of these chic glasses.

11.28.2011

This Week I Feel...Joyful

It is officially Christmas season! I hope you all had a delightful Thanksgiving and didn't stuff yourself too much. I know I really tried not to. But now it's time to move on from all the turkey, and begin decking the halls. And, if you are anything like me, you are struggling with how to decorate. Now, I have my staple decorations that go up every year, but other than that, I flutter between going glitz or traditional. Well this week, I'm settled on traditional. And don't get me wrong, it could easily change. But, right now I'm loving the traditional red and green.  I love tartan accents and strands of cranberries on the tree. I've even already brought the outside in by spray painting some pine cones silver. I love how homey and comfy my house feels when there is a pine tree scent and green garland wrapped on the banister. But no matter what I chose, there will definitely be mistletoe hanging in the entry way! 

How are you decorating this year?

Images: {Row 1} 1, 2, 3 {Row 2} 1, 2, 3 {Row 3} 1, 2 {Row 4} 1, 2, 3, 4

11.25.2011

The Perfect Gift {The Fashionista}


If you ask me, it's pretty easy to shop for the fashionista. But, I know it can be rather difficult for many. Just ask my family. I have apparently become so difficult to shop for, that for the past 5-10 years, I have been picking out and purchasing my own gifts from family members. Really, the only surprise gift I've gotten in the past 10 years was my golf clubs from my dad about 3 years ago. And well, my necklace from R last year. But moving on, here are some enviable pieces every fashionista would love to see under the tree!

{1} Marc Jacobs Polka Dot Scarf: I would die if I opened up this cashmere and silk blend scarf on Christmas morning. Talk about to die. In black and white, it's the perfect combination of fun and classic!

{2} Talbots Sequin Blazer: It really needs not description. Talk about gorgeous. 

{3} Rose Gold Michael Kors Watch: While this watch does come in silver and gold too, I love the rose gold for an updated version of a classic. Rose gold is much softer than traditional gold, and for those who don't like mixing silver and gold, it is a great color to start with. Rose gold will go with either the silver or gold pieces lying in your jewelry box.

{4} Cole Haan Leather and Cashmere Gloves: Gloves are one of those things that everybody needs but everybody hates buying. I know I do. But nothing is better than an incredibly nice pair of gloves. They are just as important in cold weather as your jewels are when it's warm.

{5} Tory Burch Leopard Messenger Bag: Leopard is huge this year. But, animal prints are also a classic in my book. This bag will add the perfect pop to any look!

{6} Kendra Scott Tyler Necklace: Kendra Scott can do no wrong when it comes to jewelry design in my book, and this statement necklace is the perfect example. I love wearing a simple outfit and spicing it up with a big statement piece. I've been dreaming of this piece for a while now. Trust me, any fashionista would love to open this on Christmas morning! 

11.23.2011

The Perfect Gift {The Tech Lover}

If you are as technologically challenged as me, finding the perfect gift for the tech lover in your life can be nothing but an uphill battle. I know it is for me! But no worries, this year I'm giving five gifts that are beyond cool, even for someone like me! Here they are...

{1} Pop! Handset: This gold receiver will plug into your phone (it works on any phone, not just a smart phone) or laptop to make talking on your cell or on Skype a little bit more enjoyable! 

{2} Apple TV: My personal obsession. It will allow you to wirelessly stream movies, TV shows, music, and pictures from your iTunes to your TV. Not only can stream movies and TV shows from Netflix, you can rent movies and TV shows through iTunes and stream them directly on your TV. 

{3} Sony Full HD Camcorder and Projector: This 32 GB will allow you to record videos then immediately project them on to any surface. Pretty sweet! 

{4} Grace Audio Victorian Radio: Not as old school as you may think. It is actually a Wi-Fi Internet Radio. It has full built in Pandora Radio capabilities, an iPhone remote app, can hook up to your home stereo system, and so much more! 

{5} Telephoto Phone Lenses:  These are 3 lenses that magnetically attach to any phone (not just a smart phone!) to transform your cell phone camera into a professional camera. Three lenses come in the pack and transform your phone lens into Fisheye, Macro, and Wide Angle lenses. Pretty cool if you ask me! 


11.22.2011

Let's Do Brunch {Beignets}

Every family has their holiday traditions. And they always seem a bit odd to everybody else. Well I want to share one of our Thanksgiving traditions with you. It might seem a bit strange, but to us, no Thanksgiving is complete without it. Every Thanksgiving morning we wake up, run the neighborhood Turkey Trot, and follow it up with frying beignets. A little untraditional, but awesome! If you've never had a beignet, it's this fried doughnut type thing that is topped with powdered sugar. If you've ever been to New Orleans, the most famous beignets are at this place known as Cafe Du Monde. Anyways, here's a delicious recipe so you can fry up a delicious beignet!

Ingredients

  • 1/2 cup water
  • 1 tablespoon yeast
  • 1/4 cup shortening
  • 1/2 cup sugar
  • 1 teaspoon salt
  • 1 cup boiling water
  • 1 cup evaporated milk
  • 2 eggs, beaten
  • 7 1/2 cups flour
  • 1 quart vegetable oil for frying
  • 1 cup confectioners' sugar for dusting

Directions

  1. Pour 1/2 cup room temperature water into a small bowl. Sprinkle the yeast over the water and let stand for about 5 minutes to dissolve.
  2. Combine the shortening, sugar, and salt in a large bowl. Pour the boiling water over the shortening mixture and then stir in the evaporated milk. Wait for the mixture to cool down until it is lukewarm. Then, add the yeast and water mixture and beaten eggs.
  3. Slowly mix in the flour until the dough forms a ball. Cover the dough with plastic wrap and refrigerate for 30 minutes to 1 hour.
  4. Working with a small portion (a little larger than a baseball) at a time, roll out the dough 1/8-inch thick. Cut the rolled out dough into strips 2 to 3-inches wide, then cut again in the opposite direction and at an angle, making diamond shapes.
  5. Heat your oil for frying in a deep and wide, heavy-bottomed skillet over medium-high heat to 360 degree F (180 degrees C).
  6. Slide dough slowly into the oil to avoid splattering and deep fry until they puff up and are golden brown, 3 to 5 minutes. Carefully remove onto a rack with paper towels underneath and allow to cool until you can handle them. Place in a clean paper bag with confectioners' sugar and shake gently until covered generously or, use a sifter to dust the beignets with powdered sugar.


11.21.2011

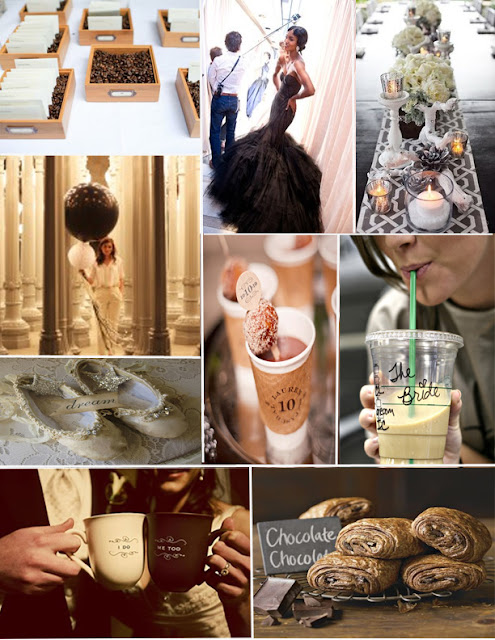
This Party Inspired By {Hot Chocolate}

If it's cold outside, nothing beats a nice warm, creamy mug of hot chocolate. And with temperatures finally cooling down here, it's just about time for a nice big glass! But until the temperatures finally reach hot chocolate weather, I suppose I will just tide myself over with a lovely bash inspired by the decadent treat. Warm shades of brown accented by soft shades of cream is the perfect pallet for a winter soiree. They make you feel cozy and are bound to make your guests feel at welcome!

11.18.2011

The Perfect Gift {The Domestic Diva}

Struggling with finding the perfect gift for everyone on your list this year? No need to worry! I'm bringing you a series of gift guides from till Christmas that will hopefully help you with the gift giving debacle. Secretly, I'm hoping it will help me too! So first, I'm tackling that domestic diva in your life. If she's anything like me, her house is everything and she loves to decorate! Here are six items that any domestic diva is bound to love!


11.17.2011

How To {Roast a Turkey}


In a continuation of my week of Thanksgiving posts, let's talk about roasting turkeys. Apparently properly roasting a turkey is quite the art. And seeing as my philosophy on cooking is throw it together and hope for the best, I do believe I am in as much need of a guide on how to properly roast a turkey as you are. Part of the reason I don't do it is because I'm too scared to mess it up. I'm afraid it's going to be too dry, or burnt, or still frozen on the inside. Frankly, there are way too many things that can go wrong. But, after reading through this guide from The Kitchn, I have new hope for making a delicious roasted turkey. So here it goes...

How to Roast a Turkey

What You Need

Ingredients
1 turkey, any size
2 cups broth or water
Melted unsalted butter (optional, for basting)
Equipment
Roasting pan (or alternative)
Roasting rack (or something to lift the turkey off the pan)
Turkey baster or spoon

Instructions

1. Prepare the Turkey for Roasting - About an hour before roasting, take the turkey out of the fridge. Remove any packaging and the bag of giblets (check in the body cavity and in the neck cavity). Set the turkey breast-side up on the roasting rack and let it sit. This takes the chill off the meat, which helps the meat cook faster and more evenly, and it dries out the skin, which promotes browning and crisping.
2. Heat the Oven to 450°F - Position an oven rack in the bottom third of your oven. If you brined your turkey, as we did, no need to do anything now. If your turkey is straight out of the package, rub it with some salt and pepper before putting it in the oven. We recommend leaving your turkey un-stuffed and un-trussed, both because it's easier and because the turkey will cook more evenly.
Optional Extras - Rub your turkey with butter or oil for a richer flavor and browner skin, rub minced herbs or ground spices into (or beneath) the skin for more flavor, place a few halved lemons or garlic cloves inside the cavity of the turkey.
3. Roast the Turkey - Pour two cups of broth or water into the roasting pan. Place the turkey in the oven and turn down the heat to 350°F. We're going for a breast-side up approach here. Some recipes advocate starting the turkey breast-side down to shield the breast meat, but the idea of flipping a hot, sputtering turkey is not our idea of a good time. Instead, we like to shield the breast meat with foil toward the end of cooking if it starts getting too browned.
4. Cooking Time - The rule of thumb for cooking a turkey is 13 minutes per pound. So our 16-pound turkey should have taken about 3 hours and 45 minutes to cook. However, some factors like brining the bird, cooking with an empty (un-stuffed) cavity, and leaving the legs un-trussed will contribute to much faster cooking. Plan on the 13-minute-per-pound rule, but start checking the temperature of your turkey about halfway through the scheduled cooking time to gauge how fast it's cooking.
5. Baste the Turkey - Every 45 minutes, remove the turkey from the oven, close the oven door (don't let that heat out!), and baste the turkey all over. To baste, tilt the pan and use a turkey baster or spoon to scoop up the liquids and drizzle them on top of the turkey. Basting with pan juices cools the surface of the turkey and slows down cooking, which in turn keeps the breast meat cooking at close to the same rate as the legs and thighs.
Optional Extra - In the last 45 minutes or so of cooking, baste the turkey with melted butter or oil. This helps crisp up the skin and turn it a beautiful deep golden brown.
5. Check the Temperature - To make sure that turkey is fully cooked through and through, we like to check its temperature in three places: the breast, the outer thigh, and the inside thigh (see photos above). In every case, the meat should be at least 165°F. If any place is under that temperature, put the turkey back in the oven for another 20 minutes. Shield the breast meat with foil if needed to keep it from overcooking.
6. Rest the Turkey - Grab one side of the roasting rack with an oven mitt and tilt the turkey so liquids inside the cavity run out into the pan. (These juices are used to make the gravy.)
Then, lift the whole turkey (still on the rack) and transfer it to a cutting board. Tent the turkey with aluminum foil and let it rest for at least 30 minutes. This gives time for the meat to firm up and the juices to be re-absorbed into the muscle tissue, making the turkey easier to slice and taste juicier.
7. Carve the Turkey - Carve the turkey the same way you would carve a chicken (click that link to see a video of the entire process of carving a chicken): Remove the wings first, then the thighs, then the breast meat. Once you have the meat off, you can separate the thighs into thighs and drumsticks and carve the breast meat into individual slices.
That's all there is to it! Roasting a turkey is really just like roasting a large chicken. The same methods and ideas apply. Even if you don't get fancy with spices or special basting liquids, your turkey will still turn out browned, moist, and flavorful.
One final note! Once you've sat down at the table, don't forget about the turkey back on the counter. The leftover meat needs to be refrigerated within two hours of cooking, after which the risk of something nasty taking up residence starts to increase exponentially. Be safe, kids!

How are you cooking your turkey this year? I'm always a fan of the turkey frying. 

11.16.2011

Let's Do Brunch {Breakfast Casserole}

Every Thanksgiving and Christmas morning, my step mom makes this amazing breakfast casserole. It's the type of casserole you don't get any other time of the year (part of why it's so good, I'm sure.)  It's so good, though, that the rest of the year I dream about this breakfast casserole. Hers is usually a combination of sausage, egg, cheeses, and bread. Sometimes there's bacon too. Basically it's this gooey mashed up goodness of everything that is bad for you, which is probably why we only get it twice a year. Anyways, while I don't have her exact recipe, I found this one the other day on The Kitchn and it is definitely worth sharing! Hope you enjoy!

Bacon, Potato & Egg Breakfast Casserole
serves 6 as a main dish
4 slices thick bacon, cut into strips about 1/2-inch wide
1 large yellow onion, peeled and diced
1 yellow bell pepper, cleaned out and diced
4 cloves garlic, minced
1/3 cup sun-dried tomatoes, chopped
2 teaspoons salt, divided
8 large eggs
1 cup milk, fat content between 1% and 4% (whole)
1 teaspoon fresh-cracked black pepper
2 cups shredded cheddar cheese
3 cups frozen diced potatoes, unthawed
Heat the oven to 350°F. Lightly grease a 13x9" baking dish with baking spray or olive oil.
Put the bacon slices in a large skillet and turn the heat on to medium. Cook the bacon, stirring occasionally, until it is crisp. Add the onion, yellow bell pepper, garlic, sun-dried tomatoes, and 1 teaspoon of salt, and cook over medium heat until all the vegetables are fragrant and soft — about 5 more minutes. Turn off the heat and let cool slightly.
In a separate bowl, beat the eggs thoroughly and whisk in the milk. Whisk in the remaining teaspoon of salt, and the black pepper. Stir in the cheese, frozen potatoes, and the bacon and vegetables from the skillet. (Don't worry; the frozen potatoes cook just fine!) Pour the whole mixture into the prepared baking dish. (At this point the casserole can be covered and refrigerated for up to 24 hours.)
When you are ready to bake the casserole, bake for 40 minutes, or until the eggs are firm and the top is slightly golden. A knife inserted in the center should come out clean.
Serve immediately with fruit and rolls or toast.


11.15.2011

This Party Inspired By {Cranberry}

Today I bring to you another Thanksgiving inspiration. What is Thanksgiving without the cranberry sauce? Although I am not the biggest fan of cranberry sauce, I am a fan of it's color. That deep pinky red color is absolutely gorgeous. It's the perfect shade for any holiday soiree. Plus, it will carry through the season. While the shade is most seen on Thanksgiving tables, it would be great for Christmas decorating as well. Stings of cranberries on your tree or in the base of a hurricane would be lovely. 

Who's getting excited for Thanksgiving next week? Are you a fan of cranberry sauce or do you just like the color like me? 

11.14.2011

Gracious Table

Thanksgiving is next week! Is anyone else as excited as I am? The turkey. The potatoes. The pumpkin pie. I'm getting anxious for quality family time, delicious food, and some intense football games. And while I'm sure your menu is all planned out and your supplies stocked in the pantry, have you thought about how you are going to decorate your table yet? It's almost as important as the turkey! Almost. Decorating your table for Thanksgiving can be simple and easy. To spice it up this year, try setting the table instead of having plates on the buffet. For centerpieces, all you really need is some mini pumpkins, multi colored dried corn on the cob or some fall leaves. These items are sure to spice up your Thanksgiving table and make your guests thankful for a gorgeous table! 

11.11.2011

Birthdays & Bonfires

Yesterday was R's birthday! And the weather here finally got cold enough to break out the fire pit. So, along with some good friends, we built a fire, made s'mores, enjoyed a cookie cake, and grilled some burgers. It was the perfect low key, fun birthday that R wanted. He is still talking about how much fun he had this morning. Until next year...Happy Birthday R! 

Have a Happy Veteran's Day and a relaxing weekend! xo

11.10.2011

Delightful Dining {Chicken Pot Pie Empanadas}

Chicken pot pie is the ultimate comfort food in my book. The buttery, flaky crust. The gooey, yummy inside. It's just perfect. And I really didn't think it could get any better. Until now. One day while pinning for new recipes, I stumbled upon this recipe from Real Simple. It's a chicken pot pie empanada. And, it's incredibly simple. Which you all should know by now is my number 1 requirement for a recipe. I must admit though that this is not my image. It was so good, and I was so hungry, I dove right in before even considering the thought of grabbing my camera. Anyways, not the point. Here is the fantastic recipe from Real Simple...

Serves 4Hands-On Time: 25m Total Time: 40m

Ingredients

  • 1 tablespoon unsalted butter
  • 1/2 yellow onion, diced
  • 1 tablespoon flour
  • 3/4 cup low-sodium chicken broth
  • 10-ounce box frozen peas and carrots
  • 3- to 4-pound store-bought rotisserie chicken, meat shredded
  • kosher salt and black pepper
  • refrigerated 9-inch piecrusts (from a 15-ounce package, such as Pillsbury)

Directions

  1. Heat oven to 400° F. Melt the butter in a saucepan over medium heat. Add the onion and cook for 3 minutes.
  2. Add the flour and cook, stirring constantly, for 1 minute.
  3. Slowly stir in the broth. Cook until thickened, about 3 minutes. Add the peas and carrots, chicken, and ¼ teaspoon each salt and pepper. Remove from heat.
  4. Cut each piecrust in half. Spoon the chicken mixture over one side of each half-circle, leaving a ½-inch border. Using your fingers, wet the border with water. Fold the crust over the chicken. Press to seal. Make three 1-inch slits in the top of each.
  5. Transfer the empanadas to a baking sheet. Bake until golden, 15 to 18 minutes.


11.09.2011

Social Graces {Handwritten}

Stick with me through this one. Trust me, it's relevant. Every year around this time, I begin the journey to start and finish my Christmas shopping long before Christmas. And while it never actually happens that way, it's always worth the effort. So, I begin by talking to my 12 year old sister about what's on her list and she informs me that she wants an iPad. Of course I am incredibly curious as to why a 12 year old would feel the need to have an iPad when she already has a laptop. I'm sure you are wondering why too. Well, apparently all the kids have them now. And they take them to class. And take their notes on them. Which made me wonder, is the art of a hand written note completely lost on the next generation? If kids can't even pull out a pen in school, what will ever make them pull out a pen to write a thank you note, or send a simple hello note?

Personally, I'm a huge fan of the handwritten note. It shows someone that you care, that you actually took the time to sit down and write to them. While I'm completely aware that technology plays a huge role in our day to day lives (I mean hello, this message is coming to you VIA the internet, and I did sit down in front of my glowing computer screen for a while to write this.), there are some occasions where a hand written letter is preferred, and more appropriate.

A handwritten note is simple, classic, and thoughtful. Do you still believe in a handwritten letter or are you all about the email?

P.S. How amazing is this stationary from Rifle Paper Co?

11.08.2011

This Party Inspired By {Pumpkin}

I was taken off guard yesterday when I finally sat down, looked at my calendar and realized that Thanksgiving is only 2 weeks from Thursday! How could it be here so soon? I can't figure out how it snuck up on me so fast, but it gets me really excited. I love Thanksgiving for a number of reasons, the family time, amazing food, the Macy's Thanksgiving Day Parade, and most importantly the pumpkin pie. I'm a little bit obsessed. Every year, my dad and I gather in the kitchen with all our supplies, and pump out pumpkin pies. It's hands down my favorite holiday treat. So what would be more amazing than your whole Thanksgiving soiree being inspired by pumpkins? Not a lot if you ask me...

What's your favorite thing to eat on Thanksgiving?


11.07.2011

An Apple a Day

They say an apple a day keeps the doctor away. But, if you ask me, an apple a day brings a new use for apples. I know that makes no sense, but during peak apple season, I can find a million and one ways to use an apple. Being such a gorgeous, fall shade, apples are perfect for decor. Fill a vase with uncut apples and use it as your everyday centerpiece. Throwing a party? Use caramel apples as escort cards, serve up some warm apple cider, or string it to make apple garland. Frankly it doesn't matter how you use an apple, just make sure you do. Because an apple a day makes for one lovely fall party! 

11.04.2011

Going Green

It seems that recently, the baby bug is in the air! I feel as though I'm finding out so someone new is pregnant every week! This got me thinking about throwing showers, and I realized I've never done an inspiration board for such a soiree. Feeling a little underwhelmed by all the gender specific pink and blue showers being thrown, I decided to mix it up a little and go green! The best part, it's gender neutral, so if the couple has decided to not find out the sex of the baby you're still good to go. If you want to take the green theme to another level, try making it a "sweet pea" bash. How cute would it be to have pea pods everywhere? And a must for a baby shower, decorating little onsies for the sweet pea to come. I'm sure the little one will go through them like crazy! 

Happy Weekend! xo

11.03.2011

Delightful Dining {Grilled Veggie Sandwich}

A couple of weeks ago on my little venture to the farmer's market, I picked up an eggplant. Never having cooked an eggplant before, I left a little lost as to what to do with it, and confused as to why I even purchased it in the first place. So, I did what I do with anything I don't know what to do with. Grilled it. Since clearly I can't eat just eggplant for dinner, I got a little hearty and made a sandwich with some squash I also had from the farmer's market, onions and chicken. And let me tell you, for being thrown together on the fly, this was a damn good sandwich. And super filling! Here's what you'll need...

Ingredients
{1} An eggplant sliced
{2} 3 squash sliced length wise
{3} An onion sliced
{4} Chicken breast
{5} Hoagie rolls
{6} Olive oil, butter, teriyaki, salt and pepper

{Step 1} Marinate your chicken in teriyaki sauce. (This is my personal favorite, but I don't think it really matters.)
{Step 2} Slice your eggplant and squash, drizzle with olive oil and sprinkle with salt and pepper
{Step 3} Slice your onion and saute until translucent
{Step 4} Grill your chicken, eggplant and squash until done
{Step 5} Slice and butter your bread. Grill butter side down to heat (about 1 minute)
{Step 6} Assemble sandwich with veggies, sliced chicken, and onions.
{Step 7} Enjoy!

11.02.2011

All Wrapped Up {Burlap Wine Bags}

Now that Halloween has passed, it's time to finally start thinking about my favorite holiday, Christmas. I know technically the Christmas season doesn't really start till after Thanksgiving, but it's never to early to start planning. And one of the things I always start thinking about first is Christmas gifts. What do I get for my parents, my sisters, my brother, etc.? Well, for friends one of my favorite things to do is a nice bottle of wine. But, you can't just hand someone a bottle, just like every other gift, it should be wrapped! And this Christmas, I'm loving the idea of wrapping bottles in burlap sacks like these. What's great is they add a little hand made touch that shows the person you put a little effort in. Stencil them with all sorts of sayings for the season like love, joy, or peace. I think I'm going to stencil mine with "uncork". Appropriate for the type of gift and that way it can be reused all year and not just at Christmas! 

xo

11.01.2011

I Will Survive!


I know it's hard to believe that you could actually forget something on your wedding day, but trust me, you will. I'm not saying it's going to be something big you forget. It's probably something small like your toothbrush or Kleenex. And it's not because you're forgetful, it's just because it's the small things that you take for granite every day and naturally assume will be around you on your big day. Well, no worries. I have prepped a Bridal Survival Kit for you! A kit of all the things you never thought you would need or be without on your wedding day. Here's what you'll need...

{1} Chalk: Chalk is actually perfect for covering up blemishes on your gown. Obviously the ideal would be that nothing get on it, but that rarely happens. Chalk is perfect for cases like this.

{2} Breath Mints: Listen, you don't want your significant other's only memory of your first kiss as a married couple to be of your bad breath.

{3} Tissues: Because even with waterproof mascara and eyeliner, you still don't want tears to be running down your face.

{4} Band-Aids: Just incase those incredibly gorgeous heels you are wearing decide to give you blisters.

{5} Deodorant: For obvious reasons of course. No one likes a smelly bride.

{6} Lip Gloss: Just so you have soft, luscious looking lips that scream kiss me!

{7} Mini Sewing Kit: Always handy for fixing a quick seam, sewing on a fallen bead, or maybe even fixing that bridesmaid's broken dress strap.

{8} Safety Pins: For the same reasons you have that mini sewing kit. Except safety pins are much quicker and can pin up a groomsman's pants when the tux place gives him the wrong size!

{9} Bobby Pins: It's hot. Your bangs are falling in your face. You have that one strand of hair that just won't stay in place. Trust me, you always need a bobby pin.

{10} Advil: This is more for the day after. Or maybe for that headache that won't go away because your mother or future mother-in-law won't stay away from you...

Interested in purchasing an Events Uncorked "Bridal Survival Kit" for $30? Send me an email and I'd be happy to send one you're way!